To replace your car's license plate lamp, first remove the lamp cover, then swap out the old bulb for a new one. Ensuring your vehicle remains legally compliant and safely visible at night involves routine maintenance, including the often-overlooked license plate lamp.
This small but crucial component illuminates your car's license plate, making it visible in low light conditions. A malfunctioning license plate lamp can lead to traffic stops and possible fines, highlighting the importance of keeping it in working order.
Tackling this task yourself not only saves you a trip to the mechanic but also equips you with valuable automotive maintenance skills. With the right tools and a bit of patience, anyone can replace a license plate lamp, ensuring their vehicle meets legal requirements and enhances road safety. This guide aims to demystify the process, making it accessible for car owners of all skill levels.
Introduction To License Plate Lamp Replacement
Driving with a non-functional license plate lamp can lead to fines. It's a critical component that ensures visibility of your vehicle’s registration number at night. Replacing this lamp is straightforward and does not require professional help. This guide walks you through the steps to replace your car's license plate lamp efficiently.
Importance Of A Functional License Plate Lamp
A working license plate lamp is crucial. It ensures that your vehicle complies with road safety regulations. This lamp allows others to identify your vehicle's registration details in low-light conditions. Therefore, a functional lamp is essential for both legal and safety reasons.
Signs Your License Plate Lamp Needs Replacement
- Dim lighting: Lamp brightness is noticeably reduced.
- Flickering: The light flickers when the vehicle is in motion.
- Non-functioning: The lamp does not turn on at all.
These signs indicate that it's time to replace the license plate lamp. Doing so will ensure your car remains safe and legal for the road.
 Tools And Materials Needed
Tools And Materials Needed
Tools and Materials Needed are crucial for a smooth license plate lamp replacement. This task requires precision and the right items. A well-prepared toolkit simplifies the process, ensuring a quick and efficient job.
List Of Essential Tools
Before starting, gather all necessary tools. This ensures a hassle-free replacement. Here's what you'll need:
- Screwdriver: To remove the lamp cover.
- Gloves: To keep hands clean and prevent bulb damage.
- Cloth: For cleaning the lamp housing.
Selecting The Right Replacement Bulb
Choosing the correct bulb is vital. It ensures compatibility and proper illumination. Follow these steps:
- Check the vehicle's manual for the bulb type.
- Match the wattage and voltage specifications.
- Opt for quality brands for longer life.
 Preparation Steps
Preparation Steps
Before diving into the task, proper preparation ensures success and safety. This section outlines the steps to prepare for replacing your car's license plate lamp.
Safety Precautions
Turn off your vehicle. Make sure it's in park with the handbrake engaged. Wear safety gloves and goggles to protect your hands and eyes. Have a fire extinguisher nearby, just in case. Work in a well-lit area to see everything clearly.
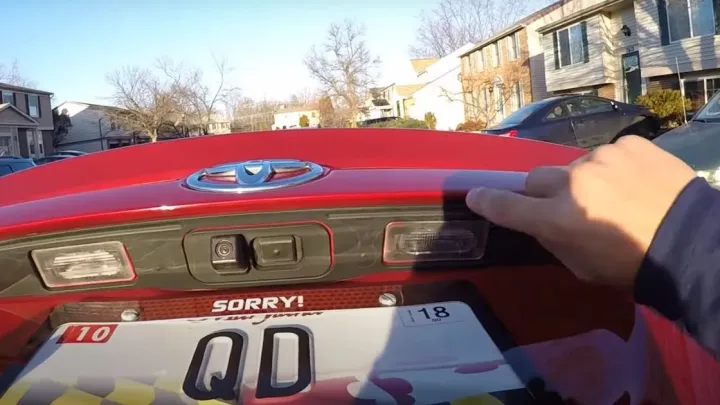
Removing The License Plate
Start by opening your car's trunk or rear hatch. Locate the license plate lamp above the plate. Use the correct screwdriver to remove screws. Keep screws in a safe place so they don't get lost. Gently take off the license plate to access the lamp.
- Locate tools needed
- Ensure the car is secure
- Protect yourself with gloves and goggles
- Work in a bright area
- Keep screws safe
Accessing The Lamp Assembly
Accessing your car's license plate lamp may seem tricky. But, with the right steps, it becomes an easy task. This section shows you how to reach the lamp assembly like a pro. Follow these tips and tricks for a smooth process.
Locating The License Plate Lamp
Finding the license plate lamp is your first step. It is usually positioned above or near the license plate. Look for a small, clear cover. This cover protects the lamp inside.
- Check your car's manual. It tells where the lamp is.
- Look at the rear of your car. The lamp is near the plate.
Techniques To Remove Housing
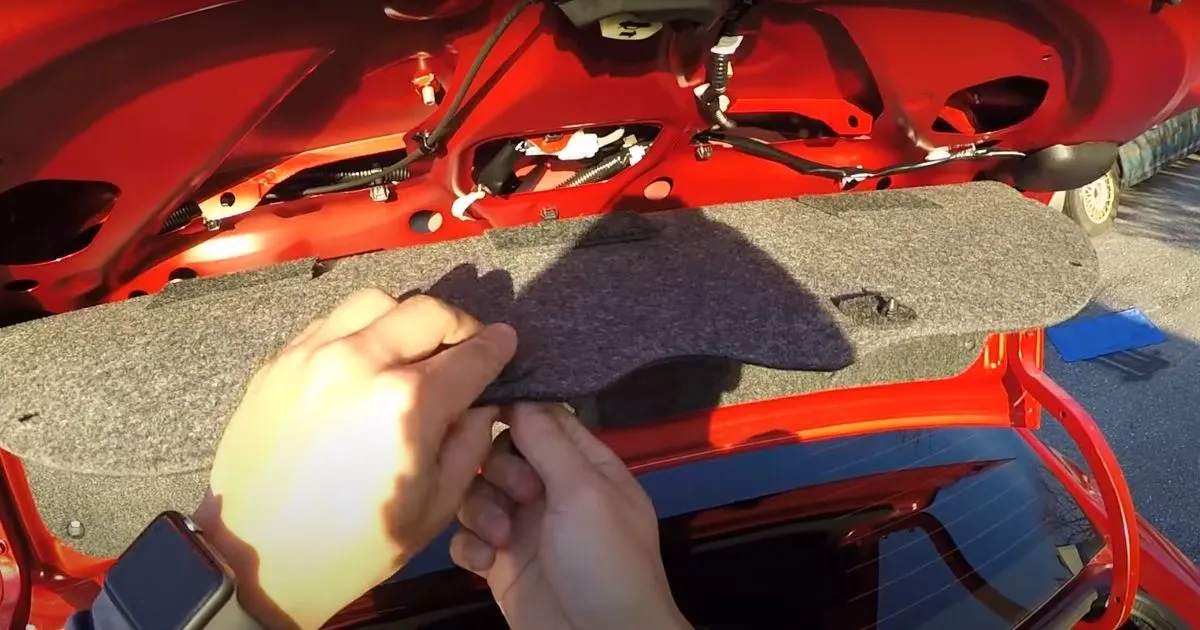
After locating the lamp, next is removing the housing. This part covers the lamp. You need to take it off to change the lamp.
- Turn off your car. Safety first.
- Find screws or clips holding the housing. They are small.
- Use a screwdriver or a clip remover. This helps to open the housing.
- Gently pull off the housing. Be careful not to break it.
With these steps, accessing the lamp assembly is easy. You can now replace the lamp like a pro.
Removing The Old Lamp
Before installing a new license plate lamp, removing the old one is key. This guide makes it easy. Follow these steps to remove the old lamp like a pro.
Steps To Safely Extract The Bulb
- Turn off your car. Ensure the lights are off too.
- Open the trunk or access panel. This step varies by car model.
- Locate the lamp holder. It's near the license plate.
- Remove the screws or clips. Use the right screwdriver.
- Gently pull out the lamp assembly. Handle it with care.
- Twist the bulb socket counter-clockwise. This will free the bulb.
- Pull the bulb straight out. Avoid touching the new bulb with bare hands.
Handling Corrosion And Complications
Sometimes, you might face corrosion or other issues. Here's how to deal with them:
- Use WD-40 or a similar product. It helps loosen rusty screws.
- If the bulb is stuck, gently wiggle it. Do not force it out.
- For severe corrosion, consider replacing the socket. Consult a professional if needed.
- Always wear gloves to protect your hands. Safety comes first.
With patience and the right tools, removing the old lamp is straightforward. Ensure all steps are followed to avoid damage.
Installing The New Lamp
Ready to shine bright again? Let's install the new license plate lamp. Follow these pro steps and light up your plate like never before. Simple, fast, and safe.
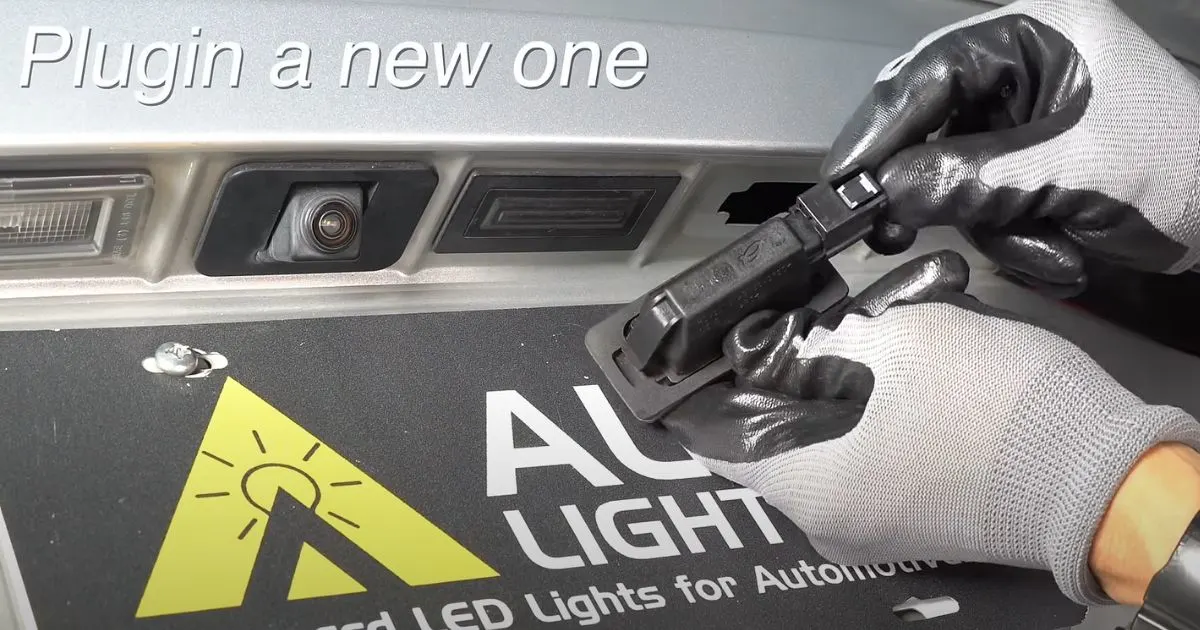
Inserting The New Bulb Correctly
First, take your new bulb. Look at the socket and the bulb's base. They should match. Gently push the bulb into the socket. Twist it if needed. Hear a click? That's good. It means the bulb is secure. Test it now before you reassemble everything.
Ensuring Proper Fit And Function
- Check alignment. The lamp should sit flush against its housing.
- Test functionality. Turn on your car's lights. The license plate should light up.
- Inspect seals. No gaps should exist. This prevents water from entering.
Done all the checks? Reattach the lamp cover. Secure it with screws. Don't overtighten. Your new license plate lamp is now installed. Say goodbye to dim plates and hello to clear visibility!
 Reassembling The Components
Reassembling The Components
With the new bulb in place, it's time to put everything back together. Reassembling the components is the final step in replacing your car's license plate lamp. This process is straightforward. Follow the steps below to ensure a secure and professional finish.
Attaching The Housing Back
Start by positioning the housing. Align it with the mounting points on your car. Check that the wires are not pinched. This could damage them and cause a short circuit. Once aligned, gently push the housing into place. You should hear a click as it snaps securely onto the car's body.
Securing The License Plate
Now, attach the license plate. Hold the plate against the designated area. Line up the holes on the plate with those on the housing. Start with the top screws to hold the plate in place. Then, insert and tighten the remaining screws. Use a screwdriver and turn clockwise until snug. Be careful not to over-tighten, as this could strip the screws or damage the plate.
Finally, test the new lamp. Turn on the car's lights to ensure the license plate lamp illuminates brightly. A well-lit plate is crucial for visibility and legality on the road. With these steps completed, you've successfully replaced your car's license plate lamp like a pro.
Testing The New License Plate Lamp
Once you've replaced your car's license plate lamp, it's crucial to ensure it's working properly. Testing the new lamp is a straightforward process. Follow these steps to confirm your new light shines bright and complies with road safety regulations.
Conducting A Functionality Check
Start by turning on your vehicle's lights. This action should power the license plate lamp. Next, step outside and check the illumination. Your license plate should be clearly visible in low light conditions. If the light functions correctly, you've successfully completed the replacement.
- Turn on vehicle lights
- Step outside and check illumination
- Ensure plate is visible
Troubleshooting Common Issues
Sometimes, you might face issues even after a fresh install. Let's troubleshoot common problems and their quick fixes.
| Problem | Solution |
|---|---|
| Lamp doesn't turn on | Check connections and fuses |
| Light is flickering | Secure the bulb and wiring |
| Dim light | Replace with a new bulb |
Ensure your connections are tight and secure. Check the fuses if the lamp fails to turn on. A flickering light often indicates a loose bulb or wiring. If the light appears dim, you might need a bulb replacement.
- Check bulb and wiring if flickering
- Use a new bulb for dim light
By following these steps, you can troubleshoot most issues with your license plate lamp. A fully functional lamp keeps you safe and legal on the road.
 Maintenance Tips
Maintenance Tips
Keeping your car's license plate lamp in top condition is essential. It ensures visibility and compliance with the law. Simple maintenance can save time and money. Let's dive into expert tips for maintaining your license plate lamp.
Regular Cleaning And Inspection
Cleanliness and vigilance are key in maintaining your car's license plate lamp. Dirt and grime can obscure the light. This makes your vehicle less visible at night. Follow these steps:
- Turn off your car and ensure the lights are cool.
- Use a soft cloth and mild detergent to wipe the lamp cover.
- Rinse with water and dry with a clean cloth.
- Inspect for any cracks or damage in the lamp cover.
- Check the bulb and connections for signs of wear.
- Replace bulbs as needed to prevent future issues.
When To Consult A Professional
Some situations require expert hands. Know when to seek help:
- If the lamp doesn't light up after a bulb change, consult a pro.
- Complex wiring issues need a skilled technician.
- For LED or high-tech lamps, professional advice is best.
- When unsure about DIY repairs, better safe than sorry.
By following these maintenance tips, your license plate lamp will function like new. Regular cleaning and professional help when needed are the pro ways to go.
Frequently Asked Questions
Can I Replace My License Plate Lamp Myself?
Absolutely! With basic tools and a new lamp, you can easily replace your license plate lamp. Ensure the vehicle is off and cool before starting.
What Tools Do I Need To Change A License Plate Light?
Typically, you'll need a screwdriver and a new bulb. Check your car's manual for any specific requirements or additional tools.
How Long Does It Take To Replace A License Plate Lamp?
Replacing a license plate lamp usually takes under 15 minutes. It's a quick DIY task that requires minimal effort and basic tools.
Is It Illegal To Drive With A Broken License Plate Light?
Yes, it's illegal to drive with a non-functional license plate light as it's essential for visibility and identification purposes at night.
Related Post
Why Clean Car Floor And Doorfront Matter for Vehicle’S Value
Why Third Parties Matter in Car Ownership And Insurance
Top Features to Look for in Registration Plate Lamps
How to Fix Trunk Lamp Not Working on a Car
How Car Center Domes Enhance Vehicle Safety And Comfort
How to Make Your Car Engine Bay Look Nice
Brighten Up Your Drive: The Ultimate Guide to Car Headlights
Conclusion
Wrapping up, mastering your car's license plate lamp replacement is simple with the right tools and steps. This DIY task saves time and money, boosting your auto maintenance skills. Remember, a functioning lamp keeps you legal and safe on the roads. Now, you're ready to shine bright with confidence!
Disclosure
Some links may be affiliate links. That means we may earn a small commission at no extra cost to you.