To install a media player in your car, first choose a compatible device. Next, follow the manufacturer's installation instructions.
Installing a media player in your car enhances your driving experience by providing entertainment and navigation options. Modern media players offer features like Bluetooth connectivity, touchscreen interfaces, and compatibility with various audio and video formats. This upgrade can make long drives more enjoyable and convenient by allowing you to stream music, access apps, and use GPS navigation.
Choosing the right media player is crucial; ensure it fits your car's dashboard and meets your specific needs. Proper installation is also essential to avoid any technical issues and ensure a seamless integration with your car's existing systems.
Tools And Materials Needed for Install Media Player on a Car
Installing a media player in your car can enhance your driving experience. To make this installation smooth, you will need specific tools and materials. This section will guide you through the essential tools and optional accessories required for the task.
Essential Tools
To install a media player in your car, gather these essential tools:
- Screwdrivers: Both flathead and Phillips types.
- Wire Stripper: For clean and precise wire removal.
- Crimping Tool: To secure wire connectors.
- Electrical Tape: For insulating wire connections.
- Panel Removal Tool: To safely remove dashboard panels.
- Multimeter: To check voltage and continuity.
- Socket Set: For loosening and tightening bolts and screws.
Optional Accessories on Media Player for Car
These optional accessories can enhance the installation process:
- Wire Harness Adapter: Simplifies the wiring process.
- Antenna Adapter: Ensures compatibility with your car's antenna.
- Dash Kit: Provides a seamless fit for the media player.
- Heat Shrink Tubing: Offers additional insulation for wire connections.
- Cable Ties: Helps in organizing and securing wires.
- USB Extension Cable: For easier access to USB ports.
| Tool/Accessory | Description |
|---|---|
| Screwdrivers | Used for various screws in the car and media player. |
| Wire Stripper | Strips the insulation from the wires. |
| Crimping Tool | Secures the wire connectors firmly. |
| Wire Harness Adapter | Makes wiring connections easier and safer. |
| Dash Kit | Ensures a perfect fit for the media player in the dashboard. |
Choosing The Right Media Player for Car

Installing a media player in your car can make your journeys more enjoyable. With the right media player, you can listen to music, watch videos, and even navigate easily.
But first, you need to choose the right media player for your car. This section will guide you through the different types and key features to consider.
Types Of Media Players for Car
| Type | Description |
|---|---|
| Single-DIN | Standard size, fits most cars, usually has a small screen. |
| Double-DIN | Larger size, often has a touch screen, more features. |
| Portable | Can be moved from car to car, often battery-powered. |
Key Features To Consider
- Screen Size: Bigger screens offer better visibility and more functions.
- Touch Screen: Easier to use, especially while driving.
- Connectivity: Look for Bluetooth, USB, and AUX options.
- Compatibility: Make sure it works with your car's system and your phone.
- Sound Quality: Check for equalizers and sound settings.
- GPS Navigation: Built-in GPS can be very useful.
- Price: Choose one that fits your budget.
Choosing the right media player can make your drives more fun and convenient. Consider the types and key features carefully to find the best match for your needs.

Preparing Your Media Player Car
Before installing a new media player in your car, proper preparation is essential. This ensures a smooth installation process and avoids any potential issues.
In this section, we'll cover the basics of preparing your car, including disconnecting the battery and removing the old media player.
Disconnecting The Battery
Disconnecting the battery is a crucial first step. This prevents any electrical short circuits.
Follow these steps to disconnect the battery safely:
- Turn off your car and remove the key from the ignition.
- Open the car hood and locate the battery.
- Use a wrench to loosen the negative terminal clamp.
- Carefully remove the negative cable from the battery.
- Secure the negative cable away from the battery to avoid contact.
Note: Always disconnect the negative terminal first to prevent electrical shocks.
Removing The Old Media Player For Car
Removing the old media player is the next step. You'll need a few tools, such as screwdrivers and panel removal tools.
Follow these steps to remove the old media player:
- Locate the trim panel surrounding the media player.
- Use a panel removal tool to gently pry off the trim panel.
- Unscrew any mounting screws holding the media player in place.
- Carefully slide the old media player out of the dashboard.
- Disconnect the wiring harness and antenna cable from the back of the media player.
Tip: Keep all screws and parts in a safe place to avoid losing them.
With the battery disconnected and the old media player removed, your car is now ready for the installation of the new media player. Make sure to follow the specific instructions provided with your new device for the best results.
Installing The New Media Player for a Car
Upgrading your car with a new media player can be exciting. It brings better sound quality and more features.
Follow these steps to install your new media player correctly.
Mounting The Media Player for a Car
First, remove the old player. Use a screwdriver to detach screws holding it in place. Slide the old player out gently.
Keep the screws safe for later use. Next, fit the new media player into the slot. Ensure it aligns perfectly.
Use the screws you kept earlier to secure it in place.
Test if the player is stable by giving it a slight pull. It should not move or wiggle.
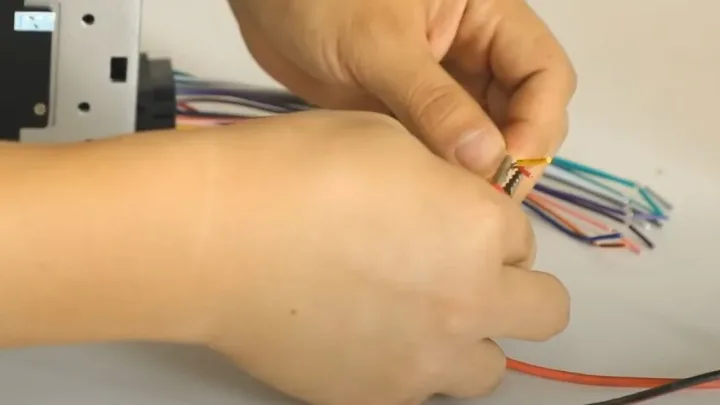
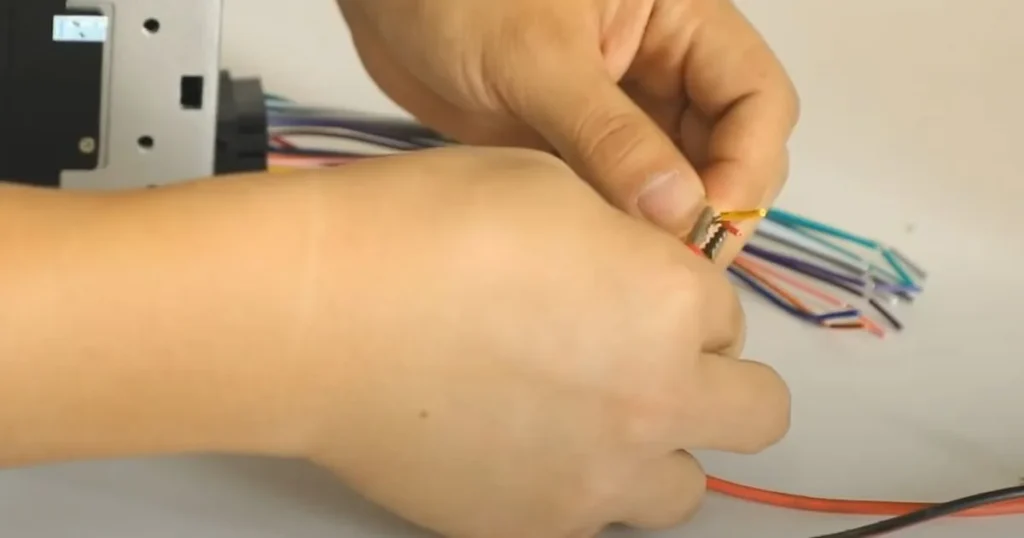
Connecting The Wires
Take the wiring harness from your new media player. Match each wire with the corresponding one in your car. Use the color codes to guide you. Red wire connects to the power source. Black wire is for the ground.
Yellow wire links to the battery for constant power. For the speakers, connect the white and grey wires to the front speakers. Connect the green and purple wires to the rear speakers.
Use wire connectors or electrical tape to secure the connections. Ensure no wires are loose. Finally, turn on the car to test the media player. Check if it powers up and plays sound correctly. If everything works well, push the player fully into the slot. Enjoy your new media player!
Testing The Installation
Testing the installation of your new media player is crucial. This ensures everything works perfectly. Let's walk through the steps to power up and check the sound and display.
Powering Up
Start by turning on your car's ignition. This will power up the media player. Look for any signs of life on the screen. Ensure the device boots up properly. Verify the power connections are tight. Loose connections can cause issues. If the media player doesn't power on, recheck the wiring. Consult the installation manual for troubleshooting tips.
Checking Sound And Display
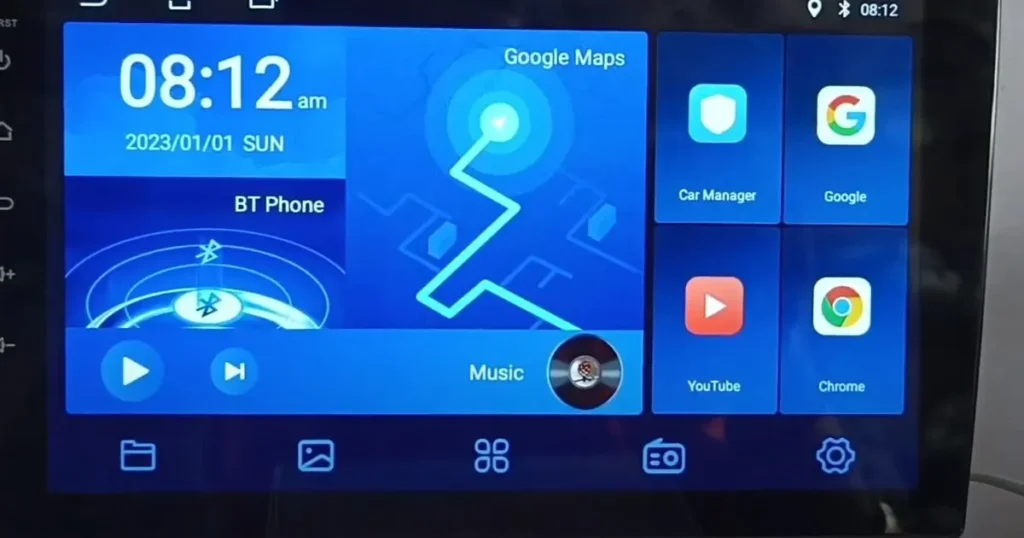
Once powered up, test the sound. Play a track or radio station. Ensure all speakers are working. Adjust the volume and balance settings. Listen for any distortions or issues.
Next, check the display. The screen should be clear and bright. Navigate through the menus. Test the touch functionality if applicable. Ensure all buttons and controls respond correctly.
| Test | Action | Expected Result |
|---|---|---|
| Power Up | Turn on ignition | Media player boots up |
| Sound Check | Play audio | Clear sound from all speakers |
| Display Check | Navigate menus | Clear and responsive screen |
- Ensure connections are secure.
- Adjust settings for optimal performance.
- Consult the manual for any issues.
By following these steps, you ensure your media player works perfectly. Enjoy your enhanced driving experience with your new media player.
Troubleshooting Common Issues
Installing a media player in your car can enhance your driving experience. But, sometimes issues can arise. In this section, we will look at common problems and solutions.
No Power
One common issue is the media player not powering on. Here are a few steps to troubleshoot:
- Check the Fuse: Ensure the fuse is not blown. Replace it if needed.
- Inspect Wiring: Make sure all wires are connected properly. Loose wires can cause power issues.
- Test the Battery: Ensure the car battery is fully charged. A weak battery can cause power problems.
Poor Sound Quality
Another issue might be poor sound quality from your media player. Here's how to fix it:
- Adjust the Settings: Check the equalizer settings. Adjust them for better sound.
- Check the Speakers: Ensure the speakers are in good condition. Replace damaged ones.
- Inspect the Wiring: Make sure the speaker wires are connected securely. Loose connections can cause poor sound.
If you follow these tips, you can solve common issues. Enjoy your media player with good sound and proper power!
Securing The Media Player for your Car
First, make sure the media player is properly aligned. Insert it into the dashboard slot. Use the screws provided to secure it in place. Tighten each screw evenly for stability.
Next, double-check the wiring connections. Ensure all wires are snug and secure. Loose wires can cause issues later. Tuck any excess wiring neatly behind the dashboard.
Reconnecting The Battery
Now, it's time to reconnect the battery. This step is crucial for powering your new media player.
Follow these steps:
- Locate the car battery under the hood.
- Attach the positive cable first.
- Next, connect the negative cable.
- Ensure both cables are tightly secured.
Your media player is now ready for a test run. Turn on your car and check the media player. Verify that all functions are working correctly.
| Check | Status |
|---|---|
| Power On | ✔️ |
| Sound Output | ✔️ |
| Screen Display | ✔️ |
| Button Functionality | ✔️ |
If everything is in order, congrats! You've successfully installed your media player. Enjoy your new in-car entertainment system.
Frequently Asked Questions
How Do I Connect My Music Media Player To My Car?
Connect your music player via Bluetooth, USB cable, or auxiliary input. Enable Bluetooth on both devices for wireless connection. Plug in the USB cable or aux cord to respective ports.
Select the input source on your car stereo. Play your music.
How To Install An Mp3 Media Player In A Car?
To install an MP3 player in a car, disconnect the battery first. Remove the existing stereo unit. Connect the MP3 player's wiring harness to the car's harness.
Secure the MP3 player in the dashboard. Reconnect the battery and test the player.
Can I Install A Dvd Media Player In My Car?
Yes, you can install a DVD player in your car. Ensure compatibility with your vehicle's system. Professional installation is recommended for best results.
Can You Add A Usb To A Car Stereo?
Yes, you can add a USB to a car stereo. Use a USB adapter or replace the stereo with a USB-compatible model.
Audio & Video
How Much Does It Cost to Get Your Car Tuner: A Comprehensive Guide
How To Check If Car Antenna Cable Is Working
How to Install Radio on a Car: Easy Step-by-Step Guide
How Much Does Best Buy Charge to Install a Car Subwoofer? Find Out!
How Much Does It Cost to Fix Speakers in a Car: Expert Breakdown
How to Connect Mobile to Car Video Player: Easy Step-by-Step Guide
How Much Does It Cost To Replace Car Antenna Assembly
Conclusion
Installing a media player in your car enhances your driving experience. Follow the steps carefully for a smooth installation. Ensure all connections are secure and test the system before driving. Enjoy your favorite music and videos on the go. Happy driving!
Disclosure
Some links may be affiliate links. That means we may earn a small commission at no extra cost to you.